


The Whiplash is the seasonal exotic pistol added in The Division 2‘s Y8S1.3 Rise Up update, which went live on May 26, 2026. It is available to all players for free, but acquiring it requires completing a specific set of prerequisites.
You must finish a Scout HVT chain, run the Pentagon Climax mission, and clear it on Master difficulty for a guaranteed first-time drop. The mission features no shortcut routes, and Ubisoft confirmed that there is absolutely no other source for this weapon.
Use the route below to unlock The Director, survive the chopper and EMP wipe mechanics on Master, defeat Jensen Sykes, and understand how Whiplash’s Faster Than Reloading talent fits into combat.
1. Whiplash Drop Sources and Best Farming Methods

Whiplash Exotic Pistol
The Pentagon Climax mission is the only source of the Whiplash pistol in the entire game. The developers confirmed that this weapon will not drop from exotic caches or targeted loot vendors under any circumstances.
Use different difficulties to decide whether you want the guaranteed first clear or repeat farming odds:
- Master difficulty, first clear: Rewards a 100% guaranteed drop.
- Master difficulty, subsequent clears: Offers a chance-based drop with the highest overall odds.
- Heroic difficulty: Provides a moderate chance-based drop, available even before a Master clear.
- Normal, Hard, and Challenging: Yields a very small chance-based drop upon completion.
The fastest path to ownership is a single Master clear. Once acquired, you can recalibrate the third attribute at the Tinkering Station if the roll does not suit your build. The weapon is also fully tradeable with any player who was in your active party when it dropped, making group farming highly efficient.
2. How to Unlock The Director Climax Mission

The Director Manhunt
The Climax mission does not appear on your map until you complete three specific Scout HVT challenges from the Y8S1 Rise Up manhunt chain. These targets must be eliminated in sequence as the season progresses, and skipping any of them completely blocks your access to the finale.
Once all three are cleared, The Director unlocks at the Pentagon. You must hunt down the following targets in order before proceeding:
- Complete Scout 3 HVT from the Rise Up Week 3 manhunt.
- Complete Scout 6 HVT from the Rise Up Week 6 manhunt.
- Complete Scout 9 HVT from the Rise Up Week 9 manhunt.
One more gate separates you from the guaranteed exotic drop: Master difficulty only unlocks after you complete The Director once on a non-Master difficulty. After that first clear, Master becomes selectable for the guaranteed Whiplash run.
Only after that initial clear does Master become selectable. If your group struggles on these lower tiers, you can signal Shepherding Agents to come to your aid via the matchmaking tab.
3. The Director Mission Walkthrough and Mechanics
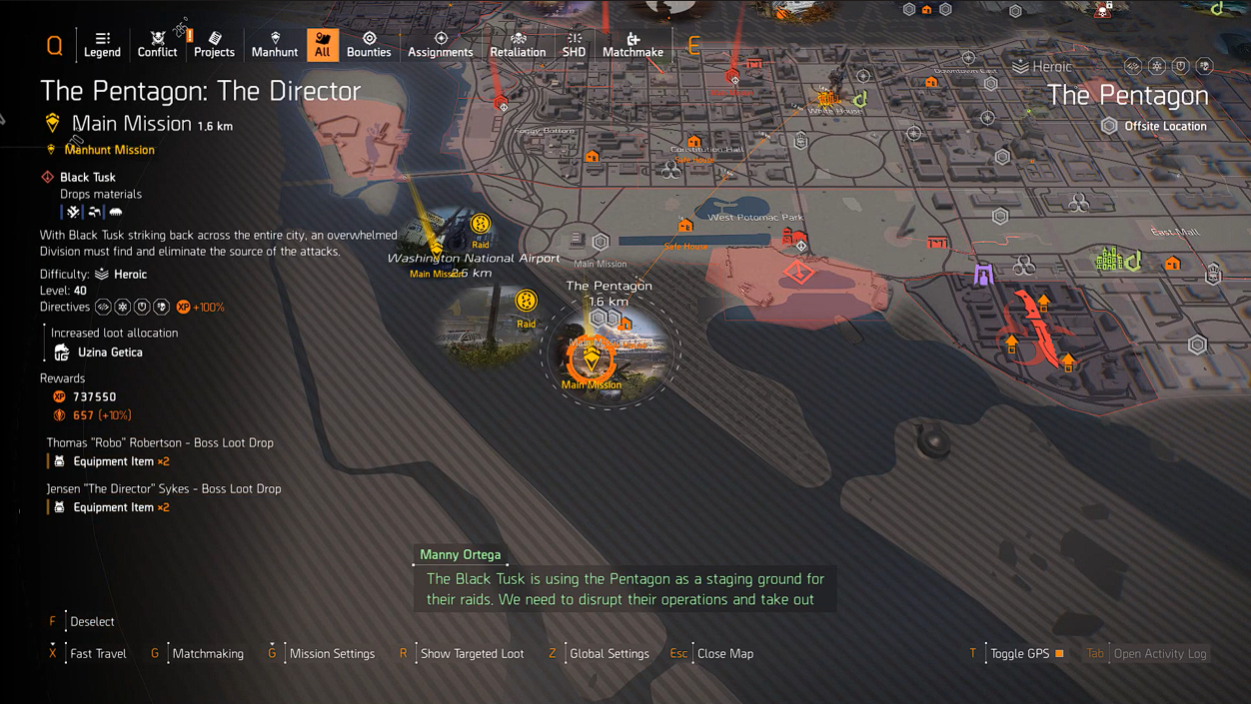
The Director Mission Location
The Director takes place inside and around the Pentagon, featuring heavy Black Tusk resistance and a final showdown with Jensen Sykes. While most of the mission involves standard room-clearing tactics, two specific encounters will stall unprepared teams at any difficulty.
3.1. Exterior Area and First Turrets

Pentagon Exterior
The mission opens at the front of the Pentagon. You must clear all enemies outside, enter through the seating lobby, and turn right to reach the first elevator to descend into the facility.
After dropping from the elevator shaft, follow the marker and clear the next group of Black Tusk enemies. Prioritize these major threats to prevent early wipes:
- Chungas with stinger backpacks: Kill these heavy targets before they close the distance.
- Sniper dogs: These robots apply bleed effects and build pressure quickly if left unchecked.
There are also two turrets at the back of this area. Rotate right to destroy the first, then left for the second. Leaving turrets active while clearing enemies drains your armor rapidly.
3.2. Pentagon Interior and First HVT

Entering the Pentagon
This phase takes you through the inner building and introduces the first light environmental puzzles. You must navigate electrified wires and eliminate a high-value target before progressing deeper into the facility.
Follow these exact steps to clear the area safely and unlock the forward gates:
- Trace the electrified wires upward to find a separate set of stairs.
- Shoot both fuse boxes at the top from a distance to cut the electricity and clear the path.
- Continue forward to the backyard and shoot the gasoline tanks near the grounded helicopter to destroy it.
- Kill the first HVT, Thomas “Robo” Robertson, who spawns in the backyard immediately after the explosion.
- Enter through the gate to the left of the downed helicopter, then interact with the first laptop to open the secured door.
- Move through the electrified corridor with your healing or shield setup ready, then interact with the second laptop at the far end.
3.3. Chopper and Immunity Box Strategy

One of the immunity boxes. Image credit to the DJTICKLE YouTube channel
This encounter marks the first truly dangerous phase of the mission. A Black Tusk chopper arrives and deploys immunity boxes that protect itself and surrounding enemies from incoming damage, a mechanic that will catch teams off guard the first time they see it.
The solution requires using the mounted turrets positioned around the area to shoot each immunity box. Destroying a box removes the chopper’s immunity for a brief window, allowing your team to damage the vehicle before the two-minute timer expires.
Assign one player to turret duty for the entire phase to focus on the following tasks:
- Rotate between the left and right turret positions to shoot immunity boxes as they spawn.
- Have the rest of the team kill incoming adds to keep pressure off the turret operator.
- Concentrate fire on the chopper whenever its immunity drops.
- Revive downed teammates instantly and watch for sniper dogs flanking the perimeter.
3.4. Electric Corridor Puzzle Tactics
Further into the facility, the path leads through a highly dangerous electric corridor. You must carefully watch the color signals to know exactly when to move and when to hold your position to avoid fatal shocks.
- White lights: The area is safe to move through and fire from.
- Red lights: Electricity is about to activate. Pull back immediately.
Clear enemies first before pushing down the corridor. Stay in the white sections and retreat to them when red activates. Destroy the two turrets and clear the Chunga spawn completely before interacting with the second laptop, or the door can bug and soft-lock the run.
3.5. Control Room and Jensen Sykes Boss Spawn

Sokolova and Skyes ECHO Recording
Follow the objective marker to the Control Room, where an Echo plays featuring Jensen Sykes. Take the door to the left of this room, which opens into a massive chamber full of elite Black Tusk mercenaries.
Eliminate every mercenary in the room first, as Director Sykes does not spawn until the area is completely cleared of standard enemies. Once the last enemy falls, The Director enters, and the final phase begins. Defeat Sykes and exit through the door with C Wing written above it to complete the mission.
4. How to Get the Guaranteed Whiplash Drop

The Pentagon: The Director Mission details
Securing the Whiplash as a guaranteed drop requires completing the mission on Master difficulty. This tier scales damage and enemy pressure significantly compared to Heroic, turning the chopper encounter and the final arena into brutal survival tests.
Before starting the mission, review these common wipe points so your team knows exactly what to avoid during the run:
- Chopper phase: The turret operator goes down or ignores the immunity boxes, preventing the team from damaging the chopper in time.
- Final room: Players ignore the pillar weak spots while focusing entirely on Sykes, triggering fatal room-wide shocks.
- Electric corridor: Poor positioning during red-light phases traps players in lethal electric fields.
4.1. Best Builds and Solo Viability

Solo Build for The Director mission
Not every player in the group needs the exact same build. The setup that works best on Master uses at least one survivable player to handle the mechanics, with the rest focused entirely on ad clear and boss damage.
Turret Operator Build
- Equip a Blue Striker build utilizing a 4-piece Striker set, a Palisade chest with Obliterate, and a Memento backpack.
- Roll Protection From Elites on every available gear slot and mod.
- Select the Survivalist specialization for added Protection From Elites.
- Run the Reviver Hive as your primary skill pick for clutch team support.
If you lack one of these exact pieces, keep the role goal the same: stack survivability and Protection From Elites to keep the turret operator alive during box rotations.
DPS Build
- Run a high-output Striker build prioritizing Crit Chance and Crit Damage rolls.
- Equip a strong Assault Rifle like St. Elmo’s Engine for reliable crowd control.
- Select the Gunner specialization for sustained firing pressure.
If you do not have St. Elmo’s Engine, use your most reliable high-damage Assault Rifle and keep the focus on Crit Chance, Crit Damage, and sustained add clear.
Solo Play Note: The mission is fully clearable solo on Master difficulty. Use a high-Protection-from-Elites Striker variant or a dedicated solo tank hybrid. Practice the turret rotation and pillar weak-spot priority, as you must manage the turrets, adds, and dogs simultaneously.
4.2. Survival Tactics for the Chopper Phase
Use the surrounding structural cover and nitrogen systems to systematically disable the Black Tusk chopper's defensive shields on Master difficulty.
The chopper phase on Master is precisely where most first-time wipes occur. The turret player serves as the absolute linchpin of this encounter. If they go down, the immunity boxes never get cleared, and the team cannot deal damage.
Follow this strict execution strategy to secure a clean clear:
- Assign the tankiest player to turret duty before entering the backyard.
- Have the turret player move between the left and right positions, ignoring damage numbers to focus entirely on shooting the boxes.
- Direct the rest of the team to concentrate fire on the chopper during every immunity-down window.
- Cover the revive immediately if the turret player goes down while another player slides into the turret seat.
4.3. Defeat Jensen Sykes and Mitigate EMP Charges

Jensen Sykes
The final room combines two lethal mechanics that run simultaneously. You must navigate periodic EMP charges that stun anyone caught in the blast while shooting weak spots on three pillars before they fully charge.
On Master difficulty, the EMP stun duration and follow-up damage make getting caught in a blast a near-guaranteed down. Keep the team spread out so a single charge does not stun multiple players, and rotate cover aggressively rather than holding one spot for the entire fight.
The pillars charge significantly faster on Master than on lower difficulties, and ignoring them while focusing on Sykes is the most common wipe cause in the final room. Use the following split strategy to handle the pillar mechanics:
- Send one player to the far side of the room near the exit door.
- Keep the remaining players positioned near the entrance side.
- Have everyone watch their designated half for red glowing weak spots on the pillars.
- Shoot any active weak spot immediately without waiting for teammates to call it out.
5. Faster Than Reloading Talent
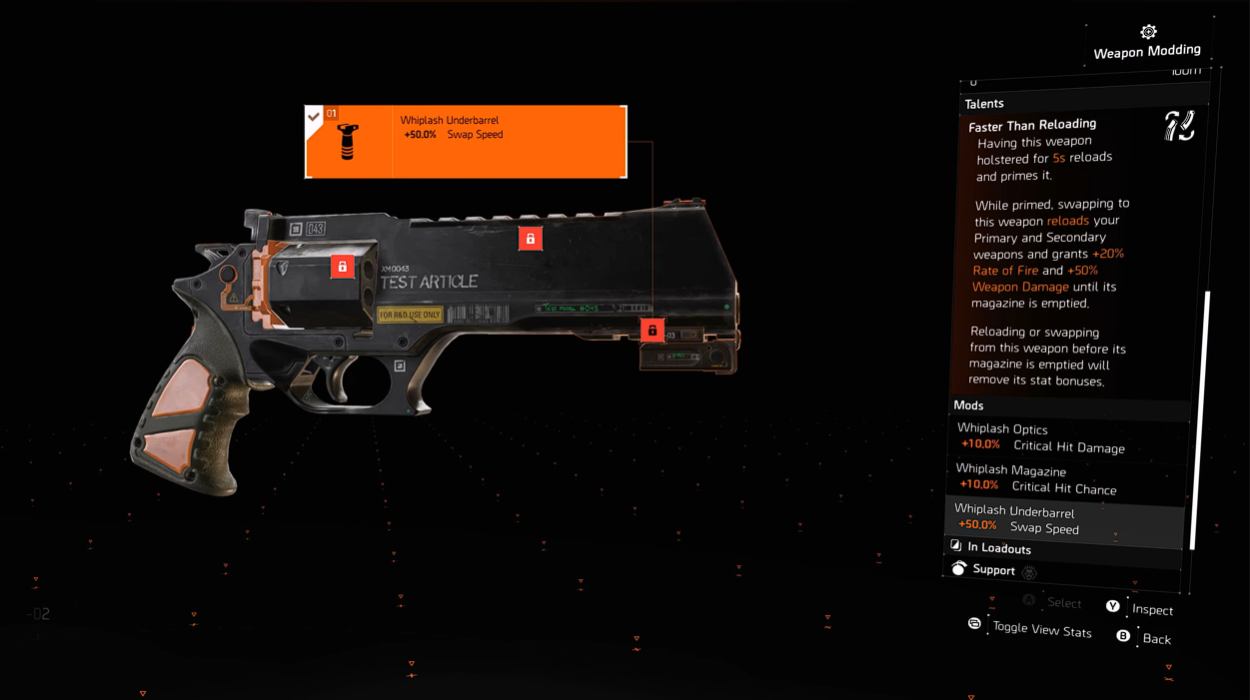
Whiplash’s Faster Than Reloading Talent
Whiplash is an Exotic Sidearm featuring the unique Faster Than Reloading talent. This revolver-style pistol utilizes a specific weapon-swap loop, making it the only sidearm in the current pool that eliminates reload downtime on both weapon slots simultaneously.
The talent features the following primary triggers:
- Having the weapon holstered for 5 seconds automatically reloads and primes it.
- Swapping to a primed Whiplash reloads your Primary and Secondary weapons instantly.
- The pistol gains +20% Rate of Fire and +50% Weapon Damage until its magazine is completely emptied.
- Reloading manually or swapping away before the magazine is empty immediately removes all stat bonuses.
To ensure the swap window never feels sluggish, the pistol comes with 50% Swap Speed built in, which the talent requires to function smoothly. To use the talent cleanly in combat:
- Keep Whiplash holstered for 5 seconds to prime it.
- Swap to Whiplash when your main weapons need a reload.
- Empty the full Whiplash magazine to keep the Rate of Fire and Weapon Damage bonuses active.
- Avoid manual reloads and early swaps, because either action removes the bonuses immediately.
Related posts:


